
Are Your 3D Prints Plagued by Droopy Overhangs and Frustrating Support Removal? You’re not alone! Mastering 3D Printing Supports is crucial for achieving high-quality prints, especially when creating intricate designs for your aquarium. This guide dives deep into the world of 3D printing supports, focusing on how to optimize them using the powerful Orca Slicer so you can achieve flawless results every time.
What Are 3D Printing Supports and Why You Need Them?
Imagine building a bridge without any scaffolding—that’s what 3D printing without supports would look like! 3D Printing Supports are temporary structures that hold up parts of your model that would otherwise hang in mid-air during the printing process. They’re essential for preventing overhangs, bridging gaps, and ensuring that complex geometries print correctly. Think of them as the unsung heroes of 3D printing.
Types of 3D Printing Supports: Choosing the Right Tool for the Job
Just like a carpenter has different tools for different tasks, there are various types of 3D printing supports, each with its strengths and weaknesses:
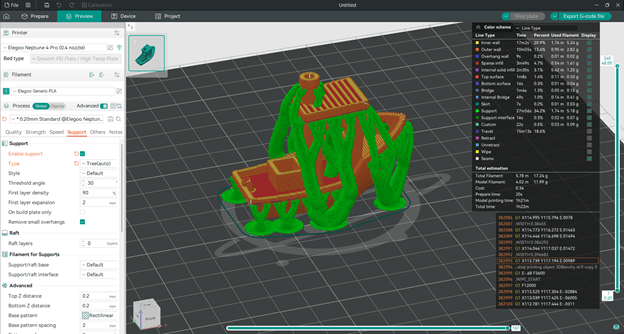
Tree Supports
Organic, branching supports grow upward to hold overhangs while using less material. They are easier to remove than traditional supports and leave minimal surface marks. Perfect for intricate aquarium decorations!
Linear/Grid Supports
Classic supports form a grid-like structure. They’re strong and reliable, perfect for large overhangs, but can be more challenging to remove.
Breakaway Supports
Designed for easy removal, these supports detach cleanly with minimal effort. They’re a great option when you want to minimize post-processing.
Dissolvable Supports
The ultimate in convenience! Using a dual-extruder printer, you can print supports with a special filament that dissolves in water or a solvent. Say goodbye to manual removal!
Common Support Problems (and How to Avoid Them)
We’ve all been there—struggling to remove supports, damaging our prints in the process, or wasting filament on excessive support structures. Here are some common problems and how to avoid them:
- The Dreaded Adhesion – Supports that stick too tightly to the model can be a nightmare to remove.
- Material Waste – Too many supports mean wasted filament and longer print times.
- Surface Scars – Improperly placed or removed supports can leave blemishes on your print.
Orca Slicer Supports: Your 3D Printing Optimization Powerhouse
Before discussing Orca Slicer, it’s important to understand why slicers are necessary. A slicer is software that converts a 3D model (such as an STL or OBJ file) into G-code, a set of machine instructions that tells the printer how to build the object layer by layer. Without a slicer, the printer would not know how to process a digital model.
Orca Slicer is a game-changer when it comes to support optimization. This powerful slicing software gives you granular control over your support settings, allowing you to fine-tune every aspect of their placement, density, and removal while optimizing print speed and material usage.
Some key features of Orca Slicer include:
- Adaptive Supports – Generates supports only where necessary, reducing filament waste.
- Customizable Z-Distance and Air Gaps – Ensures supports are easy to remove without damaging the print.
- Variable Layer Heights – Adjusts print detail and strength dynamically for improved efficiency.
- Multi-Material Compatibility – Supports dissolvable and breakaway support materials for easy removal.
- Preview & Simulation Tools – Allows users to visualize support placement and anticipate problem areas before printing, reducing failed prints.
Optimizing Orca Slicer – Remove 3D Printing Supports Effortless
Here’s your step-by-step guide to mastering support optimization in Orca Slicer:
- Choosing the Right Support Type – For intricate aquarium designs, tree supports are often your best bet. They offer a good balance of strength and easy removal.
- Dialing in the Density – Start with a support density of 15-25%. Experiment to find the sweet spot between sufficient support and easy removal.
- The Z-Distance Sweet Spot – A Z-distance of 0.2-0.3mm between the support and your model is a good starting point. This small gap makes removal easier.
- Interface Layer Density – Lowering the interface layer density (50-70%) helps prevent the supports from fusing to your print.
- Temperature and Speed Tweaks – Slightly lower print temperatures and slower print speeds can also improve support removal.
- Support Material Magic – If you have a dual-extruder, consider using dissolvable support material for truly effortless removal.
- Brim or Raft for Stability – A brim or raft can help prevent supports from detaching during printing, especially for tall or complex models.
Pro Tips for 3D Printing Supports Removal
Preview Power – Always preview your support placement in Orca Slicer before printing.
Tool Time – Invest in some good quality tools, like needle-nose pliers and flush cutters.
Heat Help – A little bit of heat can sometimes make support removal easier.
Share Your Support Success Stories!
Have you tried optimizing supports in Orca Slicer? Drop your feedback in the comments! I’d love to see your creations and help refine your 3D printing process. Also, be sure to check out the Aquireef store for more amazing aquarium & terrarium designs!